Most people enjoy having at least some bubbles in their Kombucha. A fizzy glass of booch can be fun, adds to the flavor, and offers a “natural soda” type of experience, all of which have helped Kombucha become so popular. But it’s also true that Kombucha carbonation can be a tricky thing to master at first.
Utilizing these tips and tricks will help infuse your brew with more Kombucha carbonation than ever before. Just be careful not to overdo it! (Tips about that below too)
Once you have a routine, bottling a bubbly brew will be second nature!
However, if you landed on this page, chances are your Kombucha is either:
Good news: Carbonation is a skill, not a mystery — and once you understand how it works, it becomes one of the most fun (and forgiving) parts of Kombucha brewing.
At Kombucha Kamp, we’ve helped countless brewers go from “Why is my Kombucha dead inside?” to “I just made natural soda that rivals the store stuff — come over and taste this RIGHT NOW.”
This guide will walk you through:
Let’s get fizzy.
To get good carbonation, you don’t need to memorize chemistry — but a little understanding goes a long way.
That’s it. A three-step dance.
Yeast doesn’t care if the sugar comes from:
If yeast has sugar, warmth, and an airtight bottle, it makes bubbles.
The rest is technique.
Before we talk bottles and flavors, we need to clear up the most common misconception:
The SCOBY lives here. It’s all about:
There’s usually light natural fizz, but nothing dramatic.
The SCOBY does produce CO₂, but escapes through the cloth cover.
Let’s call this step “Creating the Base Brew”. This is liquid gold and serves as the canvas for all of your fizzy, flavorful creations.
THIS is where carbonation is born.
This is your “bottle ferment.”
Here you:
If Kombucha were beer, F1 would be “brewing,” and F2 would be “conditioning in the bottle.”
All the magic happens here.
If your bottles are flimsy?
Your fizz journey will resemble a crime scene. Seriously – this looks cool on social media, but having to clean fruit, fizz, and yeasty bits off of your ceilings, counters, carpets, and possibly pets… not fun. Trust me.
Think of carbonation as a recipe:
Sugar + Yeast + Warmth + Airtight Bottle = Bubbles
✔ A healthy F1 (not overly acidic)
✔ Sugar added in F2 (even a little)
✔ Bottles sealed tightly
✔ Warm environment (75–85°F / 24–29°C)
✔ Time
✖ Fancy carbonation equipment
✖ Perfect SCOBYs
✖ Sterile conditions
✖ Expensive flavorings
You already have everything you need. Let’s move into flavors — because flavors = sugar = fizz.
If fizz is the goal, always include something fermentable.
This is the exact method we teach brewers worldwide:
Fill each bottle ¾ of the way with finished F1 Kombucha.
Choose:
Don’t overthink it — Kombucha is forgiving.
Leave 1–2 inches at the top.
Too much headspace = weak fizz
Too little = overfizz
Airtight seal = carbonation guaranteed.
Carbonation thrives around 75–85°F (24–29°C).
A cold F2 = flat Kombucha
A warm F2 = fizzy, happy Kombucha
Especially for:
Burping = prevent explosions.
Once it’s fizzy to your liking, refrigerate to slow fermentation.
Chill = fizz preservation
Warm = continued pressure
Kombucha should hiss when opened — not scream.
If your Kombucha is flat, it’s for one of these reasons:
Cold = sleepy yeast
Solution:
Without sugar, yeast has no fuel.
Solution:
Store bottles don’t always seal tightly.
Solution:
Very acidic Kombucha = yeast slowdown.
Solution:
Over-strained Kombucha sometimes loses yeast.
Solution:
Refrigerated Kombucha = no fizz
Solution:
Some batches fizz in 24 hours
Some take 3–7 days
Solution:
Exploding bottles are the #1 carbonation fear — and almost always preventable. We have a more comprehensive guide to avoiding this common pitfall HERE.
✔ Using thick, pressure-rated bottles
✔ Burping bottles daily (especially with fruit)
✔ Refrigerating promptly once fizzy
✔ Leaving proper headspace
✔ Avoiding over-sugaring
✔ Keeping flavorings consistent
If you’ve ever opened a bottle and it sprayed like a shaken volcano…
Congratulations, you made champagne Kombucha. 🍾
Now dial it back one notch.
Not too much — yeast is very enthusiastic.
Some brewers collect active yeast from the F1 bottom and add a spoonful to each bottle.
Ginger + yeast = sparkle magic.
Layer puree + juice for multi-stage fermentation.
A classic carbonation booster.
If you’re fancy (and we love fancy), heat mats for F2 are amazing. We have some great ones in the Kombucha Kamp Shop.
Only if bottled improperly. Use swing-tops, burp daily, refrigerate promptly.
Temperature or sugar is almost always the culprit.
Too warm + too sugary + too long in F2.
No. Yeast needs sugar to make bubbles.
Slightly, but usually under 0.5% ABV.
Yeast is still fermenting — it’s alive in the bottle.
Carbonation might seem unpredictable at first, but once you get the hang of:
…it becomes shockingly easy to make Kombucha that rivals anything sold commercially.
And unlike store-bought brands, yours will be:
✔ fresher
✔ better tasting
✔ customized
✔ naturally carbonated
✔ infused with real ingredients
Use this guide anytime your Kombucha needs a little sparkle in its life.
Kombucha: A Bridge To Holistic Healing & Rebel’s Drink For Revolutionary Times For the low price of only $147 you will…
KOMBUCHA JAR KIT FEATURES 1 Heirloom SCOBY w/ Starter Liquid 2oz Hannah's Special Tea Blend Muslin Tea Bags 1 Cup…
Spigot Brush for Cleaning Brew-Safe Spigots Sometimes yeast or bits of SCOBY may collect inside the spigot and clog up…
THIS 2-GALLON JUN KIT FEATURES: 2 Heirloom RAW HONEY JUN Cultures - makes 2 gallons of JUN in the first…
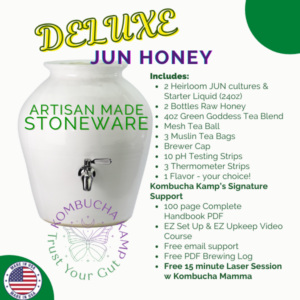